It is easy to build a bolt-on bike from parts in catalogues. But to truely build a custom you have to get out in the shed and make it. This way it will be a unique one off that nobody else will have, and you can take pride in the fact you sweated and made it. If things go right it will also look just the way you wanted no compromises here.
Here is a photo essay of one of the premier metalsmiths of
our time, Mr. Ron Covell, as he created a truly unique, custom canted gas tank. This is a cool piece of tin.
 |
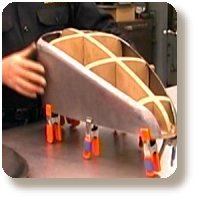
| Ron begins this tank like so many others he has built in the past. It all starts with a buck, constructed from 1/4-inch plywood and wooden dowels. The buck rests on the frame and acts as a guide to follow as he shapes the sheetmetal. |
 |
| Ron's initial step involves making a chipboard pattern that represents the right side of the tank. |
 |
| After the pattern is placed on a sheet of 0.080-inch 3003 H-4 aluminum, Ron traces around the outside, giving himself a line to trim to. |
 |
| Armed with a bench-mounted Beverly shear, Ron trims the shape from the large sheet of aluminum. This cut could have just as easily been made with an ordinary pair of aircraft shears. |
 |
After annealing (softening) the aluminum with an acetylene torch, Ron pulls out a sandbag and a mallet. Once the metal cools, it is worked with the mallet to put a bulge in the center of it.
|
 |
| A shrinking machine is used around the edges of the panel. The machine uses two sets of jaws to squeeze the metal together. By doing this, the edges start to fall into the same contour as the portion he previously worked with the mallet. |
 |
Ron continuously uses the buck to verify the part is taking the correct form. This constant checking keeps it from getting too far from the desired shape. Here, a T-dolly and slap hammer are used to create a very tight radius at the rear of the tank.
|
 |
Switching to a post dolly, Ron begins smoothing out the irregularities in the larger radiuses.
|
 |
With the right-side panel complete, Ron moves on to the top piece. He does this by creating another chipboard pattern, outlining on a sheet of aluminum, trimming, annealing, and shaping with a sandbag and mallet as before.
|
 |
Here, the top panel is being compared to the buck before the edges are worked in the shrinking machine. From there, it's off to the English Wheel for smoothing before getting another test fit.
|
 |
| Once the shape of the top panel is to Ron's liking, it's back on the buck where he scribes a guideline for trimming |
 |
A pair of aircraft shears is used to trim the top edge of the right side of the tank. This edge will line up with the right side of the top piece that was just cut.
|
 |
Ron uses a TIG welder to tack the two tank pieces together around the buck. Although an oxyacetylene torch could be used for this, the TIG poses less danger of burning up the buck.
|
 |
Now it's on to the left side of the tank. Since this piece will have so much curve to it, Ron finds it's best to make the pattern from a piece of butcher paper.
|
 |
OK, time for a quiz. What's Ron doing here -- for the third time? That's right, he's using the sandbag and a mallet once again. The difference this time: He used the shrinking tool first.
|
 |
| Here, we get a really good look at the English Wheel at work. The part is sandwiched in between two rollers (the lower one is hidden by the tank part). Pressure is applied to the part by squeezing the rollers together as the part is rolled back and forth between the rollers, forcing the bumps and irregularities out of the part. |
 |
The buck stops here! Ron checks the fit of the left side one last time before removing the buck prior to welding.
|
 |
A couple of tack welds with the TIG are all that are needed to hold the pieces together.
|
 |
Ron breaks out the oxyacetylene torch, flux, and some filler rods. A uniform bead of weld is laid down as the first two parts are joined together. Next, another bead will join the remaining pieces of the tank.
|
 |
When the bead was put down, Ron made sure it had a low profile. This low profile allows him to easily flatten the weld with both his hammer and dolly.
|
 |
Due to its broad face, Ron uses a slap hammer to blend the flow of the contours between the side and the top of the tank.
|
 |
After verifying the welds are flat and the contours are smoothed, Ron breaks out a draw file to reveal any low spots on the tank -- this process is called metalfinishing. Any areas the file does not touch are worked-up with a hammer and dolly, then refiled. This procedure is repeated until the file touches every part of the tank. Filler could be used at this point if the tank is to be painted. But if polished, the draw file process is the only acceptable method.
|
 |
| Now it's on to the tunnel. A sheet of 1/8-inch aluminum is the material of choice - it will provide a sturdy base for the mounting system. A press brake is used to bend the piece to the proper dimensions. |
 |
A steel threaded bung is welded into the backbone providing a mounting location for the rear of the tank.
|
 |
Once the gas cap location was determined, a hole saw was used to create the opening for the bung. With the bung tacked in place, Ron runs a bead all the way around it to ensure it has a good seal.
|
 |
Ron installs a rubber grommet in a hole at the back of the tunnel. The grommet will provide cushioning for the rear tank mount.
|
 |
A bandsaw is used to trim the sides of the tunnel to match up with the sides of the tank.
|
 |
This piece fills the space between the tunnel and the right side of the tank. After some trimming and shaping, Ron tacks it in place.
|
 |
An aluminum bung with 3/8-inch internal thread is welded into the bottom of the tank as a future home for the petcock.
|
 |
| One last piece is required to close up the skin of the tank. After it is fit and tacked, Ron completes the remainder of the welding before the final smoothing. |
 |
| Done, ready for prep & paint . |
This is definitely on my todo list along with so much else……………. Thanks Ron.


No comments:
Post a Comment