Wednesday 29 June 2011

I got PROOF!

So I have booked in for Monday to get my Roadworthy Certificate finally!

I have proof that indicators are not required on my bike as it is a 1974 which pre dates the requirement for indicators which came in June 1975………
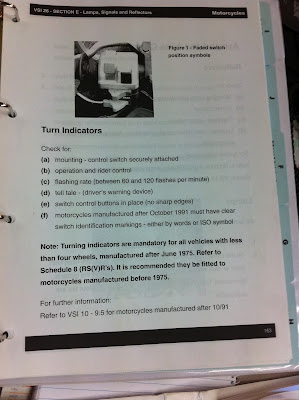
See paragraph in bold.


Took the bike out for a spin this evening and she is a temperament lil bitch…..I am starting to find neutral. But if I am still in gear when I pull up I can't get it and only sometimes when rolling or when the engine is off.  I am having issues starting the bike still.

Can't kick start it cold, and take heaps to get her to fire up from the battery.  If I stall the bike cos I missed neutral, it is still hard to elec start but will often fire up with one kick.  I am happy about the kick as I don't won't to be stuck at an intersection not being able to start.

Thinking here about getting a Pamco or Boyer system, and getting rid of the old electrics.  Need more info here.

The other thing that may come up for the RWC is the stop light doesn't work off the hand brake only the foot brake.

Wednesday 22 June 2011

New Battery Arrived today!

Ok so my new batty arrived today its an SSB.  Swapped her over and boom she fired right up! Even though she has been sitting out under a tarp in the F'n Cold!  It's bloody freezin today….

Speaking of cold……I found out that batteries are temperature sensitive and cold weather tends to kill them.. So when a battery is on its last legs it will generally fail when the winter starts.  So the battery in the bike might have been enjoying the QLD WEATHER AND SUICIDED WHEN IT EXPERIENCED MELBOURNE WINTER!

Took her for a quick spin around the block cos it was raining and she stalled on me (Cos I missed neutral again) and was a bitch to start again. In fact I though I was goin to have to push her home and it ain't flat ground around here that's for sure!

So I still have some questions as to what is the cause.

Well with the new battery I was able to test my head light and made some more discoveries.  The switch on the elec box under the seat has three positions. Since the headlamp was broken when I got her I assumed it was off/Low/Hi  well it aint so.  It is off/tail light, speedo light/headlight. The hi/lo is still on the bars.
Really weird way of doing things to my mind.

Also cleared some space in the garage and bought her in………….Will see if she is allowed to stay or the bike & I get the boot out in the street???

Wednesday 15 June 2011

The Batteries are against me.

Went in search of a multimeter to use to test the bikes battery, and found my old one I had since primary school, so looking at over 25yrs old.  Any way didn't work so I popped the back of it.
It cleaned up ok, so maybe some fresh batteries and it will work still?

Found a younger version in the cupboard.

WHAT COULD GO, WRONG DID GO WRONG!

Had a terrible day today!

Decided to fit my new headlight.  Plan was to put a rubber grommet into the back o the housing to prevent the rough metal edge from cutting the wires. Remove screw cap joiners and use mini torch to solder the wires and cover in heat shrink. Plug in head lamp, use dermal to cut notches for locating tabs. Take battery off charger, test head light and go for a spin.
Original blown headlight with massive crack in it. Also not 'E' marked so wouldn't have passed RWC.

Had to drill out hole in housing to ½" take the grommet, and gave it a little polish while it was out.

Original wiring, under the balk tape on both the red wires is a stripped section of bare wire.  Also you can see the sharp hole the wires were coming through.


Grommet Fitted.
Minitorch was out of gas so after an hour of moving boxes to get to the cupboard and then more time looking through said cupboard I found the butane refill.  Filled torch but the little F@#ker would not stay a light. So much for soldering the wires.  Ended up trimming the wires and found they have some stripped sections which I covered in heat shrink and used a cig lighter to shrink as the torch wasn't working. Stuck the sew cap joiners back on.
My Rewire job.


Comparison of the lights from the back. not the three tabs on the back of the new headlamp.
Got out the dremel and fitted a small cut-off wheel. Had the dremel for about 3 years now and never used it.  Bought for a previously abandoned project.  Had plenty of plans for it with the bike including engraving some parts. Plugged the dremel in an hit the power button wiz-stop! Tripped the circuit breakers and dremel is dead! So there goes notching the housing for the headlight tabs.

Threw the battery back in the bike off the charger, No juice!  The tail light comes on, no head light no even a tickle when I try to start the bike.  Jumped on the kicker about a dozen times no go either!
New Semi Sealed Head Lamp Installed.  No to keen on the flat edge that runs around the outside. But couldn't find a nice curved lens like the original with an 'E' mark.

Packed my shit up in disgust and called it a night!

Still don't understand if there is an electrical problem or the battery is just buggered?


So still no closer to getting a RWC!

Monday 13 June 2011

Quick Touch Up

Well the battery is on the charger yet again…….The bike is always flat when I go to start it and still not sure wether it is a shit battery or a short etc…

Still researching the best battery to get but need to bite the bullet and grab one soon.

Been unsuccessfully chasing the semi sealed 5¾" headlamp.  I have located a sealed headlamp and may just have to go with that for the time being.  

I di pick up some heat shrink, and rubber grommets to use when I change over the headlamp to tidy things up.

Grabbed a rattle can today to do a quick tidy up of some of the parts to make her look a bit more cared for. Hopefully this will help with the RWC.

The Newspaper bike!  Mummified the bike while I sprayed it.

Looks way better than all the chipped multi colored paint around the frame.

While I was at it I decided to give this a quick coat.  I painted part of the bars as they had really rough & rusty weld showing where the bars had been stepped down from 1" to ⅞"…..Tried to make it less noticeable.


Dunno what this is all about doesn't look like it belongs to an XS


The Beast!  A GMF Senior 8" bench grinder I picked up many years ago, with the intention of having  converted to single phase by my brother in law.  15yrs later still gathering dust.  Promises-promises.


Might just try and get a 3phase plug and wire it in.

Thursday 9 June 2011

FENDER DON'T FIT SOOOOOOOO GOOOOOOOOD

I just sized my rear fender against the frame and I don't think it fits right!

I have a Elswick Hardtail: (You can read dramas I had with that earlier in the blog)

Yamaha XS650/TX650 Hardtail 1974-1982 For 180/200mm Rear Tire XS1665W
This hardtail will fit all Yamaha XS650 and TX650 models built between 1974 and 1985. This hardtail is wider than stock at the rear to accept a 180 or 200 rear tire on a 5.5" Harley wheel with the use of an offset drive sprocket or a wide tire kit. 
Specs:
1" diameter x .120" wall seat tubes and lower tubes
3/8" thick axle plates with a 3/4" axle slot
Includes stainless steel axle adjuster bolts and detailed installation instructions


I have a 5.5" x18" rear wheel and a 9" wide fender.

The frame is over 10" wide between axles. I thought the fender should be a snug fit not have over an inch gap??

I was told the 9" fender is correct for a 200mm tyre.    Where did things go astray???


over 25.. or an inch gap

260mm Between Axle plates


9" Fender

Cool Lens 7 Cool PHOTO

Custo Limited Edition Sugar Skull lens for the 33  Tail light…………Thinking I should get one for my Tailight.


Tuesday 7 June 2011

When The POSTMAN RINGS!


The postman arrived toady with two boxes from the USA one for me and one for my little lady which also turns out will be for me.  She has bought me some “ride Bells” aka “Gremlin Bells”  one for each bike to keep me safe……………How cool is that!


So what is in the big box????  Well it is the Holy Hardtail!   

To sum things up with how the process went with Elswick Cycles over my hardtail.

The Bike arrived today the 6/7/11,  According to the Label it was sent 21/5/11.
So it took 2wks to get here.

However it was supposed to be dispatched as soon as payment for shipping was made which was on the 5/5/11…two weeks earlier.


Also the order is incomplete………….I purchase included a Slug for the backbone when I cut and rake it. It didn’t come, another promise by Robert that wasn’t delivered.

Contacted Robert and ordered way back in Feb & pad for it as requested, Was told he was going to make it on April 15,  Got a request for payment of shipping on May 5th would be sent as soon as I paid which I did same day, and most of it arrived today June 7……………4mths……

The welds look good to me and I am keen to have a play with it.  But my priority at the present is to get the lady register in my name so I have a ride while I build the bikes.


Hopefully it is straight and fits well and I can forget about all the headaches and ride the F-Outta the Bitch!!!

Monday 6 June 2011

GOLDIE vs BLACKIE………….Current StaPinched riste

Pinched Risers to use on Naked Lady.

I got 2 reservoir caps in the junk box hopefully one fits this.


Stock Pipes

Still has carbs.

No battery and clear of wiring unlike the lady who has a birds nest in here.


Wiring at first glance appears complete, but not connected.

Blackie….Not carbs but thats, ok cos I got 3 extra set to choose from.

Love the way the rear fender is attached.

No gauges, got a dash in the box and a single speedo. Options!


I don't want to know at this stage.


Look Ma not brakes……….


Yeah what can I say………..Hmmm