Was just thinking this springer and my girder could be distant relatives or a bastard child.
The spring set up on my girder is similar to that on early OEM harley springers. It is unlike any other girder I have seen.
Wednesday, 29 February 2012
Tuesday, 28 February 2012
The dirty girder……
Here is the last of
the loot from the swap. My major
purchase.
The dirty girder………..
This thing is heavy as
hell and needs a good clean up.
The chrome straps and risers is cactus. The rest of the thing has a dark
brown paint chipping off it and possibly old chrome underneath. The bottom has axle clamps, not
normally seen on girders in my experience. One of these is missing the guy who
sold it to me said it was in his truck & would post it to me…….I doubt I
will ever see it.
Looks like it has drainage holes and grease nipples. I think from the weight it is soild not tube, and the bolts will all need replacing.
Good place to start..
Anyone seen one like this before love to know the history of it. Guy who sold it didn't know anything about it.
Looks like it has drainage holes and grease nipples. I think from the weight it is soild not tube, and the bolts will all need replacing.
Good place to start..
Anyone seen one like this before love to know the history of it. Guy who sold it didn't know anything about it.
I’m thinking of
painting the metal black and having the chrome brass plated.
Monday, 27 February 2012
Foot Peg Fetish MKII
Bit of background on another of the odd pegs.
I love old, used parts and trying to find out their history.

Old set of Drag Specialties Holy Pegs. These were a knock off of Randy Smith's Custom Cycle Engineering Holy Pegs and are cast steel instead of aluminum. I checked the D.S. catalog and they are no longer available.

They are threaded for a fine thread 3/8" bolt.
The original C.C.E. Holy Pegs are almost impossible to find and are priced accordingly.
Great pegs for a vintage chopper or bob job.
I love old, used parts and trying to find out their history.

Old set of Drag Specialties Holy Pegs. These were a knock off of Randy Smith's Custom Cycle Engineering Holy Pegs and are cast steel instead of aluminum. I checked the D.S. catalog and they are no longer available.

They are threaded for a fine thread 3/8" bolt.
The original C.C.E. Holy Pegs are almost impossible to find and are priced accordingly.
Great pegs for a vintage chopper or bob job.
Foot Peg Fetish…...
Doing a bit of research on my odd pegs from the swap I came across a post MCartwebzine
http://motorcycleart.blogspot.com.au
You will see the relevance at the bottom in the comments section, re my Rocky peg.
http://motorcycleart.blogspot.com.au
You will see the relevance at the bottom in the comments section, re my Rocky peg.
WEDNESDAY, JANUARY 28, 2009
Foot Peg Fetish
At one time chopper standard equipment included: Bates headlights and seats, Wassell tanks and ribbed fenders, Flanders risers and bars, and Anderson pegs.

In order of coolness, from left to right: Anderson, Posa Fuel, Holy Pegs, and H-D. Does anybody know anything about Anderson or it's history?

Note the markings. Holy Pegs (no name). Harley's are marked H-D on tip and Made in Taiwan (boo!) inside. The Anderson's are aluminum, not sure on the center two. H-D's are heavy pot metal.
The steel mount for the Anderson above is incorrect. The threads in the original aluminum mounts tended to strip. I have two sets and both have the mounts replaced with steel units. I have saved some original aluminum ones but they need repair.
The Posa peg and the Holy peg were mismatched in a box of parts I recently bought. I have since found another Holy Peg so, now I'll look for a Posa. Posa Fuel and Lake made those (injector) slider carburetors in the 70's. I don't know who made the Holy Pegs, Custom Chrome sold and may still sell them.
Harley still sells the ones on the far right with clamps (H-D #49144-86), as a multi-fit item for engine guards/crash bars.

Unknown NOS stamped steel pegs and mounts. I once had (sold), two of these sets. One set had a flat instead of rounded tip. They have very subtle round bumps on them.
This is just a small sample of the different styles and brands out there. I've seen some very similar to Anderson but marked ETB?

In order of coolness, from left to right: Anderson, Posa Fuel, Holy Pegs, and H-D. Does anybody know anything about Anderson or it's history?

Note the markings. Holy Pegs (no name). Harley's are marked H-D on tip and Made in Taiwan (boo!) inside. The Anderson's are aluminum, not sure on the center two. H-D's are heavy pot metal.
The steel mount for the Anderson above is incorrect. The threads in the original aluminum mounts tended to strip. I have two sets and both have the mounts replaced with steel units. I have saved some original aluminum ones but they need repair.
The Posa peg and the Holy peg were mismatched in a box of parts I recently bought. I have since found another Holy Peg so, now I'll look for a Posa. Posa Fuel and Lake made those (injector) slider carburetors in the 70's. I don't know who made the Holy Pegs, Custom Chrome sold and may still sell them.
Harley still sells the ones on the far right with clamps (H-D #49144-86), as a multi-fit item for engine guards/crash bars.

Unknown NOS stamped steel pegs and mounts. I once had (sold), two of these sets. One set had a flat instead of rounded tip. They have very subtle round bumps on them.
This is just a small sample of the different styles and brands out there. I've seen some very similar to Anderson but marked ETB?
Arlen Ness: Torpedo
ARLEN NESS BILLET GRIPS FOR 2008 TOURING MODELS • CNC machined from 6061-T6 billet aluminum • Twisting the throttle has never been smoother or easier • Chrome finish with some styles available in black anodized • Sold in pairs
Arlen Ness: Torpedo Billet Grips (Chrome)- Harley Davidson Cable Type Throttle Models (76 and newer)
Item 26-3003 USD $139.00
Arlen Ness #07-134
Fits 76-10 H-D Models (exc. 2009 FL)
Fits 76-10 H-D Models (exc. 2009 FL)
Seen them on sale for online for $99.00 so not bad for $5…….Maybe I should stick up on Flea bay and see what I can get???? Put the profits towards getting my build finished.
More Loot……….
Few more bits of the loot from Sat at the swap……….
 |
| Looks right just hope it is correct size for the colchester. At $20 it was the second most expensive item of the weekend. Yes I'm a cheap bastard!!!!!! |
There is one more score left to show and I'm keeping the best for last!!!!! Stay posted!
Tips and Tricks for Vintage Racers
More from www.vintagebrake.com
Tips and Tricks for Vintage Racers
DISC BRAKE TIPS
Change fluid with Castrol LMA (especially Lockheed users) or Ferodo DOT 4 Racing for severe usage, at least annually, more frequently in humid climates or if used for racing(1-2 events). DOT 5 silicone brake fluid is NOT recommended.
DO NOT use aerosol cleaners-some leave residues that promote glazing.
Continued glass beading of rotors will optimize performance.
When changing pads, always prepare the disc rotors by cleaning with an aggressive scrubbing with Scotch-Brite (steel grade) abrasive pads, 180 grit sandpaper, or glass beading (preferred) to remove boundary layer deposited by previous pads. Rinse with MEK, denatured alcohol, or acetone.
Many compounds need a heat cycle to fully cure them. You shouldn't start a race on a fresh set unless you are sure that compound doesn't require it.
Disc lightening--drilling vs. thinning: both will reduce mass and therefore heat sink capability. Some pluses for drilling.: If the holes drilled are smaller in diameter than the thickness of the disc, surface area is increased. With the right pattern, potential for warpage is decreased. Holes or slots with give the gas bubble created someplace to dissipate. Finally, the thicker disc allows the pads to sit deeper in the caliper, minimizing cocking and enhancing retraction. The down side is that it is very difficult and usually impossible to drill a pattern that will sweep the entire face of the pad, creating uneven pad and disc wear. Thinned discs need to be slotted. Grey iron rotors (vintage Norton and Triumph) should not be modified.
Check material for fit on the disc. Lockheed applications where the friction material rides out over the edge of the disc will benefit from the use of the Grimeca application-- moves material down 3mm.
DRUM BRAKE TIPS
Carefully inspect drum surface for grooves (obvious), crown (not so obvious), out of round and high-low spots (dial indicator). Crown often occurs with riveted linings. High-low spots commonly result when relacing hubs. There is no substitute for a freshly turned drum for premium friction materials to bed-in against. It's like putting a new piston in an old bore-never as good as with a fresh bore and hone. And you should inspect drum surface with the same critical eye. Tolerance: .002 to .004”" any dimension. Up to .010” out-of-round may be tolerated.
If you are re-riveting new linings yourself, DO NOT drill out the rivets. Chisel off the peened end and drive the rivet out.
Materials currently available far exceed those previously available. Reline your shoes with a current premium compound
Keep in mind the low unit pressures required for mechanically operated drum brakes. Most linings require the higher unit pressures available hydraulically.
Very few modern materials are compatible with pressed steel drums.
Lay back leading edge of leading shoes in 1/2 inch increments to minimize initial "bite" if brake is too "grabby", especially when hot.
The expanded metal used to cover scoops is typically 15% to 23% open area. Replace them with stainless steel screens with 50% to 60% open area, tripling air flow.
Use sealed wheel bearings --grease vapor can contaminate linings. Once contaminated, they never recover.
.Lubricate backing plate components SPARINGLY with a 500F. + degree grease, such as Sta-Lube Sta-Plex Extreme Pressure, available at NAPA. Liberally lube parts and assemble. Disassemble and carefully remove all excess grease.
Check to see how far the backplate extends into the drum. Too far in and the sides of the shoes drag on the hub, creating excessive heat. Epoxy a shim to the inside of the backplate. Not far enough, and a ridge forms where there is no contact. Bend backplate or remove material to correct.
Worn pivot shafts cause uneven actuation. Rebush if necessary.
If a stay is used, make sure it does not cock the backplate.
Always apply brake when tightening axle.
If you want to arc the linings yourself, and have access to a lathe, first mount the relined shoes on the backing plate. Turn on the lathe (300-350rpm) to .020" under drum I.D. in .010" cuts.
MC Ratio
Since I have most of the gear to run 1" Bar set up I need to get the levers happening. So How do I match a 1" Bar (most likely HD) fitting master cylinder to my existing brakes? Well here is some interesting data to consider.
Front Master Cylinder Ratio Chart
While attending Vintage Days West, and thoroughly enjoying it, I was reminded that many of the people I had occasion to talk to, lacked an understanding of the importance of master cylinder to wheel cylinder ratios. This critical ratio is of paramount importance in determining "feel". It has been my experience that there is a "sweet spot" in the range. I like ratios in the 27:1 range-2 finger power brakes, feeling some line and/or caliper flex. 23:1 is at the other end of the spectrum-firm. Ratios lower than 20:1 can result a feel so "wooden" as to have a toggle switch effect: nothing happens until the wheel locks. Disc and wheel diameters must be taken into consideration. A 10 inch disc working against an 19" wheel just doesn't have the leverage ratio that a 13 inch disc working a 17" wheel does. The hand lever ratio counts too: witness the adjustable master cylinders from Lockheed and Brembo.
A case in point: I had a complaint from a racer about Ferodo CP901- a compound renown for its great feel. His comment was that they worked poorly until the wheel locked. He had been thrown on the ground twice. Intrigued, I inquired as to the application. "Yamaha RD350" he replied. A red flag went up. CP901 was not available for the 48mm Yamaha caliper. I asked "How that could that be?" He had up-graded his braking system with the 41mm Lockheed unit, but was unaware that a master cylinder change was in order. A stock RD 350 has an already poor ratio of 18.3 :1, and with Lockheed, became an unhealthy 13.3 :1. The "sweet spot" formula said a change to a 11 or 12mm master cylinder was in order: my personal preference and recommendation would have been an 11mm. He was able to switch to a 1/2" , and although not ideal, he was keeping the rubber side down.
For 2 piston opposed calipers, I like ratios in the 27:1 range, feeling some line and caliper flex. For a firmer lever, use 23:1. I think ratios lower than 23:1 produce a lever feel so "wooden" as to have little, if any feel. Combine "low" leverage ratios with sticky pads, and unpredictable lockup is the result. The high effort required at the lever also results in undesired input to the bars. Single piston calipers are much happier in the 14:1 to 12:1 range. Disc and wheel diameters, as well as hand lever ratios, must be considered.A case in point: I had a complaint from a racer about Ferodo CP901- a compound renown for its great feel. His comment was that they worked poorly until the wheel locked. He had been thrown on the ground twice. Intrigued, I inquired as to the application. "Yamaha RD350" he replied. A red flag went up. CP901 was not available for the 48mm Yamaha caliper. I asked "How that could that be?" He had up-graded his braking system with the 41mm Lockheed unit, but was unaware that a master cylinder change was in order. A stock RD 350 has an already poor ratio of 18.3 :1, and with Lockheed, became an unhealthy 13.3 :1. The "sweet spot" formula said a change to a 11 or 12mm master cylinder was in order: my personal preference and recommendation would have been an 11mm. He was able to switch to a 1/2" , and although not ideal, he was keeping the rubber side down.
Front Master Cylinder to Wheel Cylinder
Ratio Chart
Ratio Chart
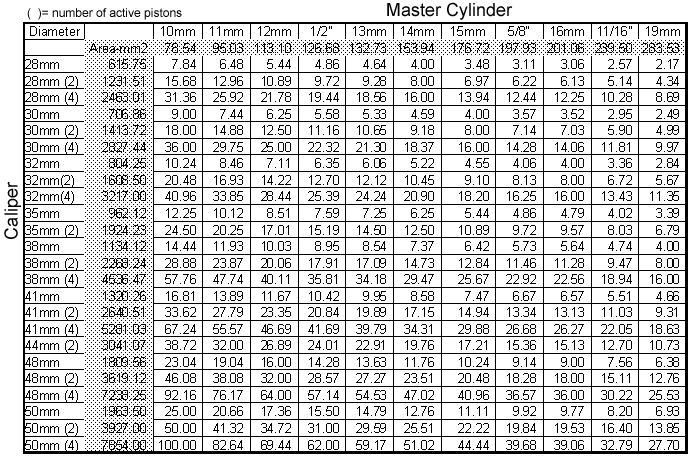 |
Sourced from www.vintagebrake.com
Now to find some data on what the XS has for a single disc 76 setup?
|
Sunday, 26 February 2012
The Swap loot Part .1
 |
| Billet Grips, Guy wanted $10, thought they must be chromed plastic chinese copies, offered $5 and got them while walking away noticed the Arlen Ness logo on em…Score! |
 |
| Another $5 which was way cheaper than the $40 they were going for everywhere else. Hoping I can rig this up to fit a headlight for the cafe-racer. |
Ballart Sat
So we arrived in Ballarat at what I used to think were my cousins house, turns out they are actually my Mother's cousins…Dunno what that makes them to me. Other than almost strangers lol. Like I said I have only met them a few times in my life.
So almost within 5min Rodney has me out in his Garage which is 3 maybe four cars wide and easily 3 cars deep. He warns me and apologises for the mess….…What mess have you seen my garage??????
So here is what I saw.
Norton in process of being restored on the bench. The Suzuki which has been on many trips including the red centre to see Ayres Rock etc.
The old Yam which was his first road bike ever and it's twin which was bought later to it's right.
The last for the FJ1200 and the fully restored Norton Comando both of these regular riders.
Quite a collection, he also had an original XS1 back in the day and is looking for another.
Later that night which we never stopped talking bikes I asked so if all that is in the little garage, then what have ya got in the big shed. The big shed is just that, twice as long as the garage and two storeys in height. Well lets just say there was I morris minor ute, a Datsun 180B (I think) ute, 4 of the same old Classics for resto (some strange rare thing I had never heard of before), a fully worked 5.7l SS comodore, his daughters lil car and the tray truck… All with room to spare.
Nice huh don't we all wish we had that space!
Sat morning up 5AM and down the swapmeet 6am, still dark.
Just cracking light by the time we walk through to the bike section, lots of guys still curled up in their swags surrounded by piles of discarded tinnies.
 |
| Most of the bikes and parts were of this vintage. |
 |
| This was a really cool lil ride! |
 |
| $23k & $30K from memory and a only a few years between the models |
 |
| Quirky lil scooter showing off this fellas polishing services. |
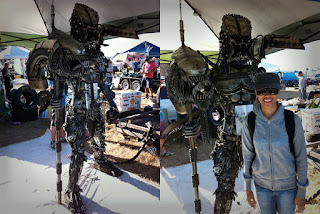 |
| Aliens 0 Predator 1 |
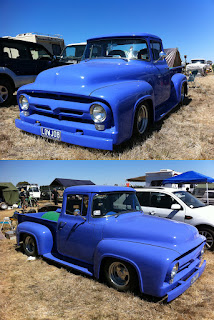 |
| Lots of early 1950s F100s & Chevs….. I want one damn it! |
I wandered constantly untill 3:30pm….so 9.5Hrs with no food and not enough water it was forecast 37Deg in Melb and out there at the swap there was no shade. It was a good experiance and I counted around 300 bike specific stalls in that section, of the 2300 total. But there was plenty of bike parts mixed in with the car stalls. I enjoyed the day throughly but was a little dissapointed that there wasn't more old bikes (50-70s). They were nearly all old 20s & 30s models. Lots of Indisn Scouts, BSA, Triumphs. Few Vincents, Ariels, & similar. Not much Harley, chopper or Custom type stuff.
I didn't get any of the stuff I had on my list, like risers, dog bones, Z bars, etc.
I did score a bit of loot though. All of which was quite heavy lugging around.
Friday, 24 February 2012
Full Throttle
Put out a call a little while back for a 1" Throttle and Clamp as I wanted some take off parts to try a 1" bars out. Didn't really want to invest much until I was sure I'd be happy.
Anyway got a parcel in the post today and it wasn't what i was expecting………I got a shiny brand new clamp and a white plastic throttle sleeve. Compliments of Olly over at Independent Parts.
I am really stoked with the generosity here. I say check em out if your in need of a few bits for ya scoot!
Independent Parts Ebay Store
Independent Parts Website
info@independentparts.com.au
Ph 9331 5400
Keilor Vic
Olly is also building a really nice 750 chop at the moment.
Thursday, 23 February 2012
Ballarat Swap
The Ballarat swap meet is on again for 2012 at the Ballarat airport this weekend, the 25th and 26th Feb. And plans are underway to make the 22-year event event — which nearly folded last year — bigger and better than ever.
The swap meet, formerly the Super Southern Swap Meet, folded in controversial circumstances last year when organisers said their lease agreement with Ballarat City Council had become unworkable. It was saved in October last year by the seven combined Rotary Clubs of Ballarat.
Lucky for me I have family in Ballarat (which I have met like a dozen times in my life)….. As I couldn't find, hotel, motel, bungalow, cabin, or camping accommodation that hasn't been booked out. What do you expect when Australia's biggest swapmeet is happening.
The Missus and I are heading down Friday night so we can hit the swapmeet nice an early. Doubt we will cover even a small percentage of the almost 2300 sites, but hope to find a few super cheap awesome treasures! I will be fighting an expected 20,000 - 40,000 bargain hunters for my treasure.
The Swap Meet is located at Ballarat Airport, on the Sunraysia Highway on the outskirts of Ballarat. Swap Meet site covers approximately 160 acres
Would have liked to ride down but taking the missus's cage so we can bring home the bits. She has never been to Ballarat so it might be a fight wether I get to go back on the Sunday or end up at Sovereign Hill or some touristy place.
Unfortunately motorbikes and mini bikes are banned. Looks like you'll need something to get around.

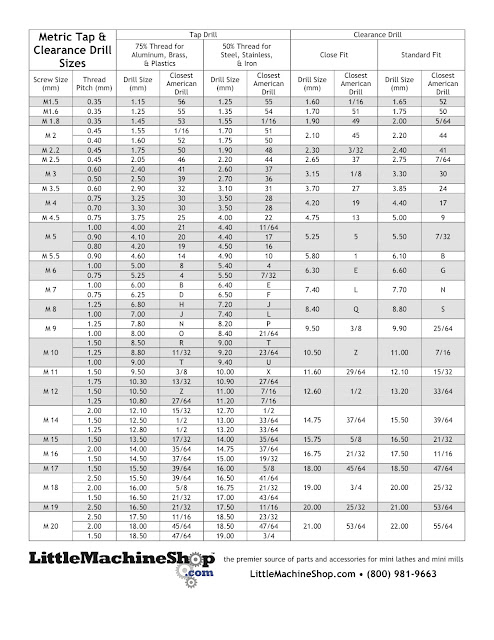
Metric Drill Tap Chart
Amazing how hard it was to find this with metric Tap Size and Metric Hole Size.
For some stupid reason all the data had Metric Tap with, Imperial/Guage size/Imperial Decimal, etc, etc.
Now I need to know if the bolts are coarse thread or fine??
Download Here
Here is another that actually shows there is a differance between thread depth for softer Brass, Aluminium etc (75% thread depth) and harder steel (50% thread depth)
Download Here
Parts Manuals
Thought these might be useful to people. Click on relevant link below.
XS Models
1950-1996/XS/XS1_XSB_XS2_TX650.PDF
/XS650.PDF
XS650D_E_F.PDF
XS650G.PDF
XS650SE_SF_SG.PDF
XS650SH.PDF
XS650SJ.PDF
XS650SK.PDF
XS650_H.PDF
TX/TX65A_XS650.PDF
All YAMAHA
All Yamaha Parts Manuals 1950-1996
XS Models
1950-1996/XS/XS1_XSB_XS2_TX650.PDF
/XS650.PDF
XS650D_E_F.PDF
XS650G.PDF
XS650SE_SF_SG.PDF
XS650SH.PDF
XS650SJ.PDF
XS650SK.PDF
XS650_H.PDF
TX/TX65A_XS650.PDF
All YAMAHA
All Yamaha Parts Manuals 1950-1996
Sick & Twisted
Spoke to my frame builder today and due to the nature of the complex bends in my design, he would have to out source the bending to a CNC bender. $800 inc materials. just for the bends :-( Not happy with that.
Might have to throw in the towel after all that work. Just don't have that kinda cash.
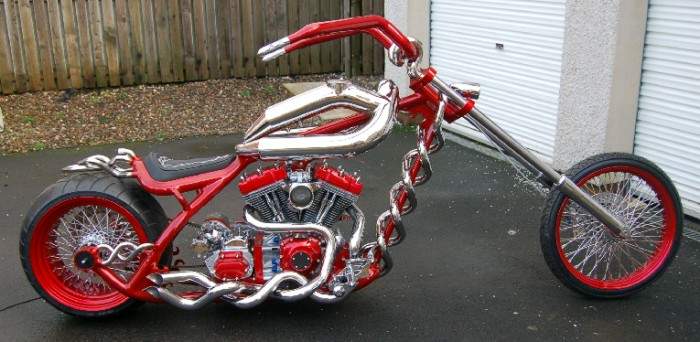
In the spirit of bending metal, here is a seriously BENT bike………
This bike is named Sick n Twisted, because it was built around a twisted front down tube. Peter Chumley spent two years constructing the motorcycle, which features a Harley Davidson twin-cam 1450cc motor, and a one-off frame, tank and bars.
All chassis components are built using stainless steel, which Chumley has then painted or polished to achieve the final look.
I thought maybe it was named Sick n Twisted, because it took a sick and twisted mind to like the way it looks!
Points for different, point for unique, negative score for proportions, taste and everything else.
Saturday, 18 February 2012
Maybe something like these???
Subscribe to:
Posts (Atom)




4 COMMENTS:
People used to send the broken knockoff holy pegs to Randy asking him to replace them, because they thought they were his pegs.
I remember Randy running ads showing his Holy Peg, and a broken knockoff, asking people to be sure what they were getting and paying for came from CCE.
FRIDAY, JANUARY 30, 2009
Foot Peg Fetish Update
I stole this recently posted photo from Chopper Dave. He has been given Randy Smith's original patterns to use. Note Randy's original "Holy Pegs" pattern. Read the comments for the previous post below for more info. Don't confuse CCE (Custom Cycle Engineering), with CCI, (Custom Chrome Inc.).